Next.jsのexport機能でSSG(Static Site Generation)して、Firebaseでホスティングします。
思い付きをサクッと見れる状態に持っていけるので便利です。
用途的にはGatsbyの方が向いていますが、慣れの問題からNext.jsを使います。
また静的ファイルの配信を目的にしているのでFirebaseを使いますが、Next.jsだと普通は Vercel を使うのが楽でいいと思います。
Next.jsのexport
まずはnextjsプロジェクトを作成します。Typescriptは好みで。
|
1 |
npx create-next-app@latest --typescript |
package.json の script にexportを追加。
|
1 2 3 4 5 6 7 |
"scripts": { "dev": "next dev", "build": "next build", "start": "next start", "lint": "next lint", "export": "next build && next export" }, |
そのままexportしてみるとエラーになります。
|
1 2 3 4 5 6 |
> yarn export Read more: https://nextjs.org/docs/messages/export-image-api at \node_modules\next\dist\export\index.js:256:23 at async Span.traceAsyncFn (\node_modules\next\dist\trace\trace.js:75:20) error Command failed with exit code 1. |
next/imageパッケージはexportできません。
削除して<img>タグに変えましょう。
改めてexportするとoutフォルダに静的ファイルが出来上がります。
Firebaseにアップロードする
あらかじめ Firebase console でプロジェクトを作っておくと楽です。
プロジェクト名が誰かと重複していると、名前の後ろに文字列が付きます。
firebaseのURLをそのまま使う場合は、この文字列も含めたURLになるので注意。

プロジェクトができたらコマンドに戻ります。
ツールをインストールしてログイン、設定、デプロイのコマンドで終わりです。
|
1 2 3 4 5 |
npm install -g firebase-tools firebase login firebase init firebase deploy |
まずログインではウィンドウが開くのでgoogleアカウントでログインします。
initでは対話式で適切に選んでいくだけです。
機能選択では上のHostingのところでスペースキーを押してエンター。

先ほど作ったプロジェクトを使います(ここで作ることもできる)。

Next.jsの標準export先であるoutフォルダを指定します。

色々してくれようとしますが全部Noで。
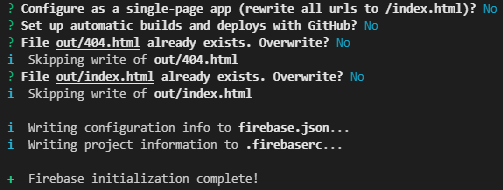
設定したらそのままデプロイすると、
[プロジェクト名].web.app か [プロジェクト名].firebaseapp.com
でアクセスできるようになります。
その他の初期設定
- .gitignore に
.firebaseを追加する。 - 新規に
srcフォルダを作り、pages, stylesフォルダを入れる。 - スクリプトに
"deploy": "yarn export && firebase deploy"を追加。 - URLの形式を .html から変更する。
Next.jsの設定を変える方法
next.config.js に trailingSlash: true を追加。
|
1 2 3 4 5 6 7 |
/** @type {import('next').NextConfig} */ const nextConfig = { reactStrictMode: true, trailingSlash: true, }; module.exports = nextConfig; |
どうしてかというと、以下のような形でtest1とtest2ページを作るとします。
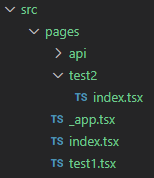
初期設定だと、どちらも***.web.app/test1.html , ***.web.app/test2.html でアクセスしないと見れません。
trailingSlash を有効にすると out 以下のフォルダ構造が変わるので***.web.app/test1 , ***.web.app/test2でアクセスできます。
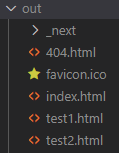 |
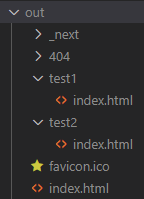 |
404ページは_error.tsxの作成でいいですが、上の設定で out/404/index.html になってしまうので、スクリプトに cp out/404/index.html out/404.html を追加する。
Firebaseの設定を変える方法
firebase.jsonに"cleanUrls": trueを入れる。
|
1 2 3 4 5 6 |
"hosting": { // ... // Drops `.html` from uploaded URLs "cleanUrls": true } |
こちらの方が簡単です。Firebaseだけで考えるとこれで十分。
- ヘッダーの再読み込み設定やセキュリティ設定( firebase.json )
|
1 2 3 4 5 6 7 8 9 10 11 12 13 14 15 16 17 18 19 20 21 22 23 24 25 |
{ "hosting": { ... "headers": [ { "source": "**", "headers": [ { "key": "Cache-Control", "value": "no-cache, no-store, must-revalidate" }, { "key": "X-Content-Type-Options", "value": "nosniff" }, { "key": "X-Frame-Options", "value": "SAMEORIGIN" }, { "key": "X-XSS-Protection", "value": "1; mode=block" } ] } ] } } |
所感
とりあえず基本的な部分はこれで設定できました。
テスト用途くらいなら無料で簡単にSSGできて便利です。
表示が非常に速くてメンテナンスフリーなのが良い。