ディスコード上で動くボットを作ろうとすると少しハードルがあります。
ウェブフックは他サービスでイベントが起きた時の通知を受け取るような用途が主ですが、自分でリクエストを投げることもできるので通知ボットを作成可能です。
Golangを使って適当なメッセージを投げてみます。
BotとWebhook
ボットはディスコードにログインして各種イベントに対して処理をしたり、ディスコードで出来ることはなんでも出来ます。
ボットアカウントを作って、権限を付けて、イベントに合わせて色々な処理を行う必要があります(ディスコードはちょくちょく落ちたりもするので特に通信/再接続に関するハンドリングが面倒)。
golangで作るならbwmarrin/discordgoというライブラリがあります。
ウェブフックはイベントが起きた時に通知を送る仕組みです。
簡単かつメンテナンスフリーですが通知(書き込み)しかできません。
つまり通知のみならウェブフックを使うのが得策。
Webhook URLの作成
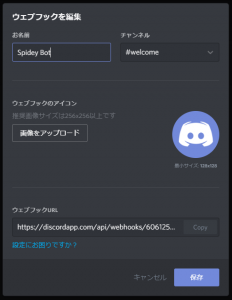
「サーバ設定」か「チャンネルの編集」を開いて「ウェブフック」タブを開く。
「ウェブフックの作成」ボタンを押すと作成画面に入ります。

名前とアイコンは通知側でも設定可能なので適当に。
チャンネルはここで設定した場所にしか送れないので通知したいところを指定(いつでも編集は可能です)。
これで出来たウェブフックURLに送信を行います。
GoでWebhookを使う
JSONを送る必要があるのでまずは構造体定義。
量が多いので適当に省いています。
構造はExecute WebhookとEmbedを参照。
|
1 2 3 4 5 6 7 8 9 10 11 12 13 14 15 16 17 18 19 20 21 22 23 24 25 26 27 28 29 30 31 32 33 |
type discordImg struct { URL string `json:"url"` H int `json:"height"` W int `json:"width"` } type discordAuthor struct { Name string `json:"name"` URL string `json:"url"` Icon string `json:"icon_url"` } type discordField struct { Name string `json:"name"` Value string `json:"value"` Inline bool `json:"inline"` } type discordEmbed struct { Title string `json:"title"` Desc string `json:"description"` URL string `json:"url"` Color int `json:"color"` Image discordImg `json:"image"` Thum discordImg `json:"thumbnail"` Author discordAuthor `json:"author"` Fields []discordField `json:"fields"` } type discordWebhook struct { UserName string `json:"username"` AvatarURL string `json:"avatar_url"` Content string `json:"content"` Embeds []discordEmbed `json:"embeds"` TTS bool `json:"tts"` } |
discordWebhookがメインで残りはEmbed(リッチな表示)用です。
処理自体は簡単で取得したURLにJSONを投げるだけ。
|
1 2 3 4 5 6 7 8 9 10 11 12 13 14 15 16 17 18 19 20 21 22 23 24 25 26 |
func sendWebhook(whurl string, dw *discordWebhook) { j, err := json.Marshal(dw) if err != nil { fmt.Println("json err:", err) return } req, err := http.NewRequest("POST", whurl, bytes.NewBuffer(j)) if err != nil { fmt.Println("new request err:", err) return } req.Header.Set("Content-Type", "application/json") client := http.Client{} resp, err := client.Do(req) if err != nil { fmt.Println("client err:", err) return } if resp.StatusCode == 204 { fmt.Println("sent", dw) //成功 } else { fmt.Printf("%#v\n", resp) //失敗 } } |
実際に送ってみます。
|
1 2 3 |
var whurl = "https://discordapp.com/api/webhooks/xxx/yyyyyyy" dw := &discordWebhook{UserName: "Narumium", Content: "Webhook Test"} sendWebhook(whurl, dw) |

名前とコンテンツを指定して遅れました。ディスコードのユーザやボットはアカウントと投稿が紐づいていますがWebhookの場合は投稿ごとに別名で投稿可能です(色んな名前で投稿するとちゃんとそのまま残る)。
画像とTTS(text-to-speech)も設定してみましょう。
|
1 |
dw := &discordWebhook{UserName: "Narumium", Content: "Webhook Test", AvatarURL: "https://blog.narumium.net/wp-content/uploads/2019/02/gopher.jpg", TTS: true} |

画像も投稿ごとに設定可能です。
TTSをオンにしたので読み上げてくれました(何言ってるかわかんなかったけど)。
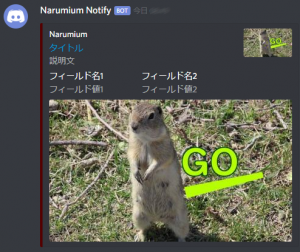
Embedも試してみます。
|
1 2 3 4 5 6 7 8 9 10 11 12 13 14 15 16 |
dw := &discordWebhook{UserName: "Narumium Notify"} dw.Embeds = []discordEmbed{ discordEmbed{ Title: "タイトル", Desc: "説明文", URL: "https://blog.narumium.net/", Color: 0x550000, Author: discordAuthor{Name: "Narumium"}, Image: discordImg{URL: "https://blog.narumium.net/wp-content/uploads/2019/02/gopher.jpg"}, Thum: discordImg{URL: "https://blog.narumium.net/wp-content/uploads/2019/02/gopher.jpg"}, Fields: []discordField{ discordField{Name: "フィールド名1", Value: "フィールド値1", Inline: true}, discordField{Name: "フィールド名2", Value: "フィールド値2", Inline: true}, }, }, } |

いい感じになりました。
